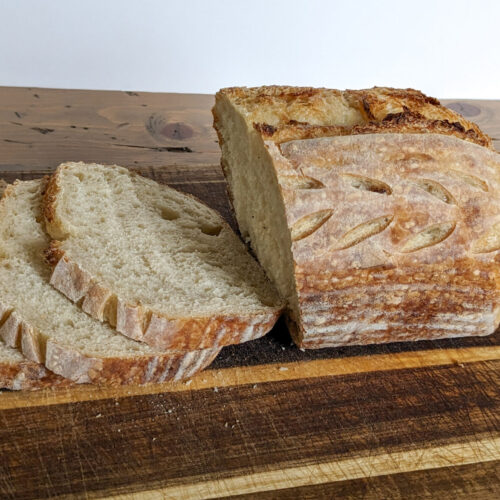
Artisan Sourdough Bread Guide- With or Without Dutch Oven
This recipe is a lower hydration dough and can be made with all-purpose flour.
As far as traditional artisan sourdough bread recipes go- this is as beginner as it gets!
What You Need
When it comes to artisan-style sourdough, there’s is a range of tools you can use, from fancy-pants, to getting-by-with-what-you-have.
Tools You’ll need:
–A Mixing Bowl + some kind of cover (can be a lid, or a damp towel) –A kitchen scale that measures in grams. For me, this is nonnegotiable for making sourdough. Weighing is so much more accurate and easy. –Banneton OR a bowl lined with a tea towel or parchment. I absolutely love my bannetons and recommend them highly. -Bench Scraper (optional, but helpful): My favorite is my silicone Kitchenaid one -Bread Lame or sharp knife: I absolutely love my UFO Lame –Parchment paper or silicone sling: I buy my parchment in bulk, and I love my BreadMat for when I use my Dutch oven. –Dutch Oven OR 2 Loaf pans: I love my uncoated cast iron dutch oven, but I have switched to the two loaf pan method because I love the shape it produces
Ingredients You’ll Need:
–Sourdough Starter, of course. If you don’t have any yet, mine can be purchased to rehydrate in as little as 3 days here. –Flour: You can use all-purpose flour for this recipe (I do), but a high protein bread flour is easier to work and more beginner friendly. – Salt: I like Himalayan salt, but any will do –Water: should be unchlorinated –Rice Flour: NOT mandatory, but I highly recommend it to prevent bread from sticking to your banneton
Feeding Your Starter
I have a more detailed article on feeding and maintaining your sourdough starter here.
For one loaf of this recipe, you will need 100g of starter, so at least 12 hours before, I would take 10g of starter and feed it 50g of flour and 50g of water.
This will take about 12 hours to peak and have a large peak window.
The starter is ready when it has at least doubled, smells sweet and not flour-y, and has lots of bubbles on the surface.
Making the Bread
Phase 1: Mixing and Gluten Development
Weigh out 325g of water into a bowl. Add 100g of sourdough starter. Mix roughly until starter has broken up.
Weigh in 500g flour and 10g salt. Mix together until no dry bits remain.
Cover bowl for 30 minutes.
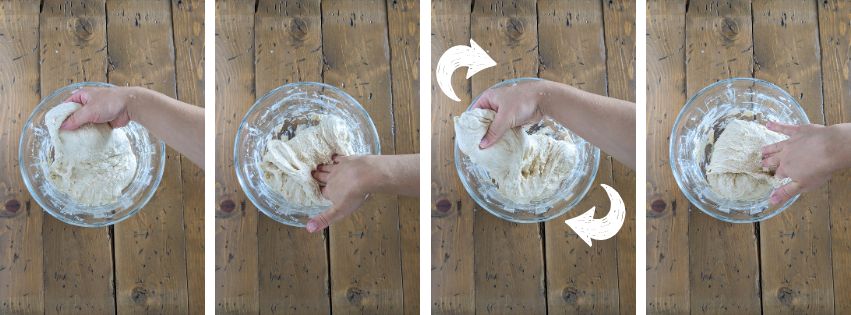
After 30 minutes, perform your first set of stretch and folds.
Lift up the dough from the back edge, pulling it up and toward yourself. You want to stretch the dough, but not enough to make it tear. Fold it back down on itself, opposite to where is started.
Rotate the bowl 90 degrees and repeat until you are back to where you started.
Cover the bowl and repeat in 30 minutes.
Do this for a total of 4-5 times.
Notice how your dough changes through this process. It will be weak, shaggy to begin with. By the second stretch, you will notice how smooth and elastic the dough is becoming.
By the final stretch, the dough should feel more tight and not stretch as far without resisting.
Phase 2: Bulk Ferment
This is the most difficult phase to master. It comes with a lot of trial and experience.
TIP: Watch the dough, not the clock.
Once the dough is fully developed, cover and let it rise. The time it takes will vary greatly depending on the temperature of the dough and the room it is in.
In the summer, it can be ready in as little as 3 hours after stretch and folds are done. In the winter, it can take as long as 12.
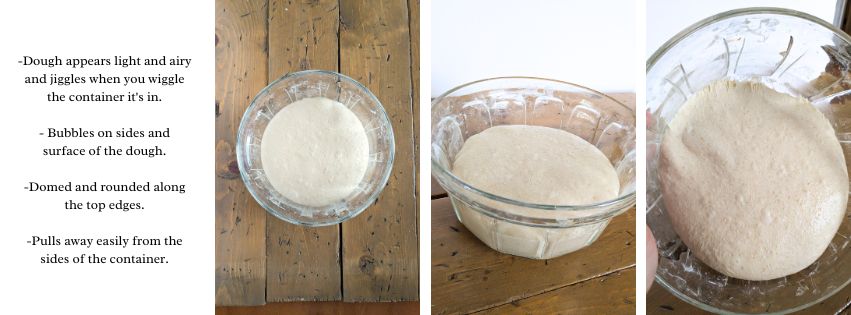
Instead of timing, you need to look for signs that the dough is proofed: -Bubbles are visible on sides and surface of the dough. -Dough appears light and airy and jiggles when you wiggle the container it’s in. -It is not sticky when you gently touch the surface. -Pulls away easily from the sides of the container. -Is domed and rounded along the top edges.
The biggest mistake people make when starting to make sourdough is underproofing their dough. I always prefer to push it to the side of over proofing versus being under. When in doubt, wait.
Phase 3: Bench Rest and Shaping
When the dough is done rising, you want to do a preshape and a bench rest. Preshaping helps develop more tension in the dough. The bench rest allows time for the gluten to relax again before final shaping.
If you made multiples of the recipes, this would also be the time to divide the dough.
Pre-shape: Lightly flour surface as needed. I do not use flour because this recipe is low hydration and when well-developed and proofed, its not very sticky.
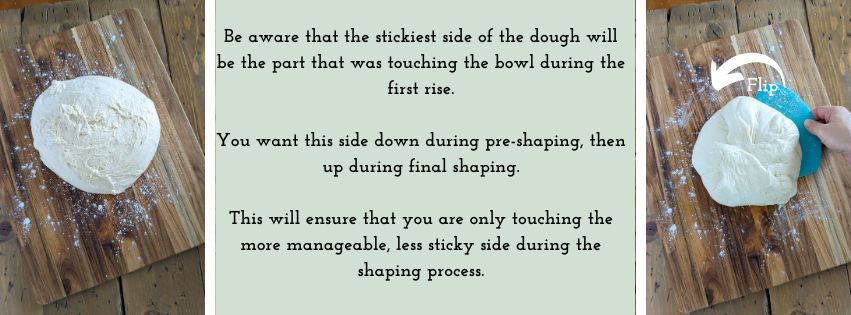
Dump the dough out of the container. The stickier part of the dough that was touching the bowl will now be facing up.
Using your bench scraper, flip the dough over, so the stickier side is now on the counter.
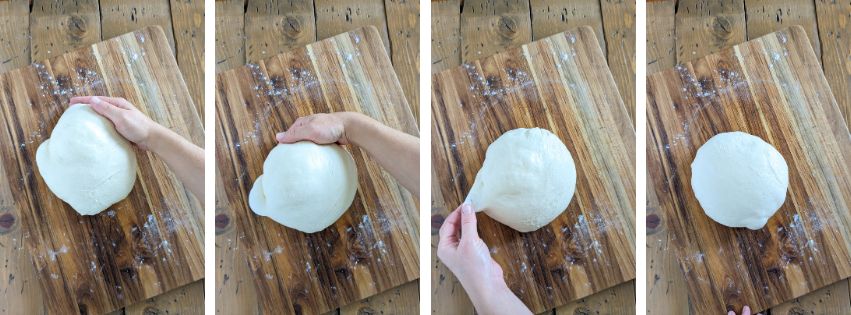
Shape it into a tight ball by slightly pushing it away and pulling it back to you. The center of the dough should remain fairly anchored to the counter during this process.
Make a snug ball, but be very mindful to not tear the surface of the dough in the process.
Pinch out any large bubbles that emerge.
Let rest for 20-30 minutes. You can cover with a towel if you wish.
After this rest, the dough should have relaxed and spread slightly.
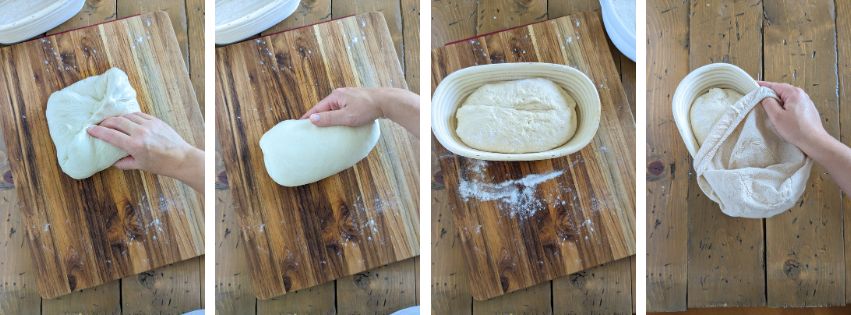
After resting, flip the dough back over, so the stickier side is up for the final shaping,
There are a lot of ways to shape artisan bread. Since this is a fairly low hydration dough, you don’t want to get too crazy or the dough will tear, You do not want these breaks in the gluten structure, so work gently and don’t over-push your dough.
I like to start by gently pulling the dough open into a rectangle. Then I fold the top down to the center, and both sides over the middle. Then I roll it up, pulling it extra tight against the counter before dunking it in rice flour and into the banneton, seam side up.
After letting it relax for about 10 minutes, I pinch the seam closed again before covering.
OPTIONAL: I always have the best results if I let my dough sit on the counter for 30-60 minutes before putting in the fridge. I wait until it is *almost* filling the banneon.
Phase 4: Final Rise/ Cold Ferment
Now that the dough is in its final shape, it needs to go through its final rise and fermentation.
Most people like to refrigerate, or cold Ferment/retard their dough before baking. This allows it to continue to ferment, but greatly slows down the proofing process. I recommend putting it in the fridge for 12-24 hours before baking.
If you would like to skip this step, you can simply allow it to rise on the counter again for a couple hours before baking.
Phase 5: Scoring and Baking
After the dough is chilled, it is time to bake. You want to preheat your oven to 450. If you are using a Dutch oven, put it in the oven before preheating and let it heat for 30 minutes before baking.
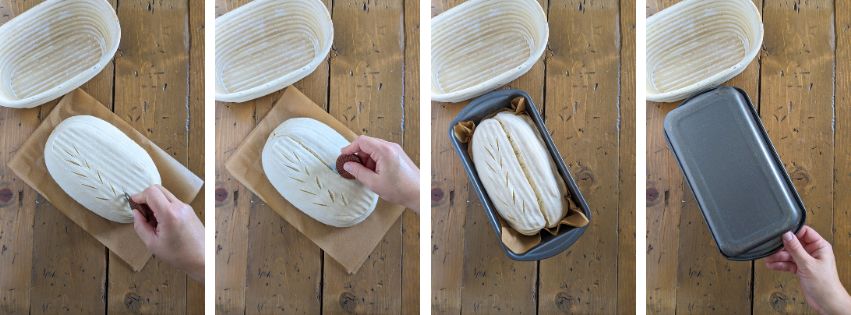
Flip the bread from the banneton on to a sheet of high-heat parchment paper.
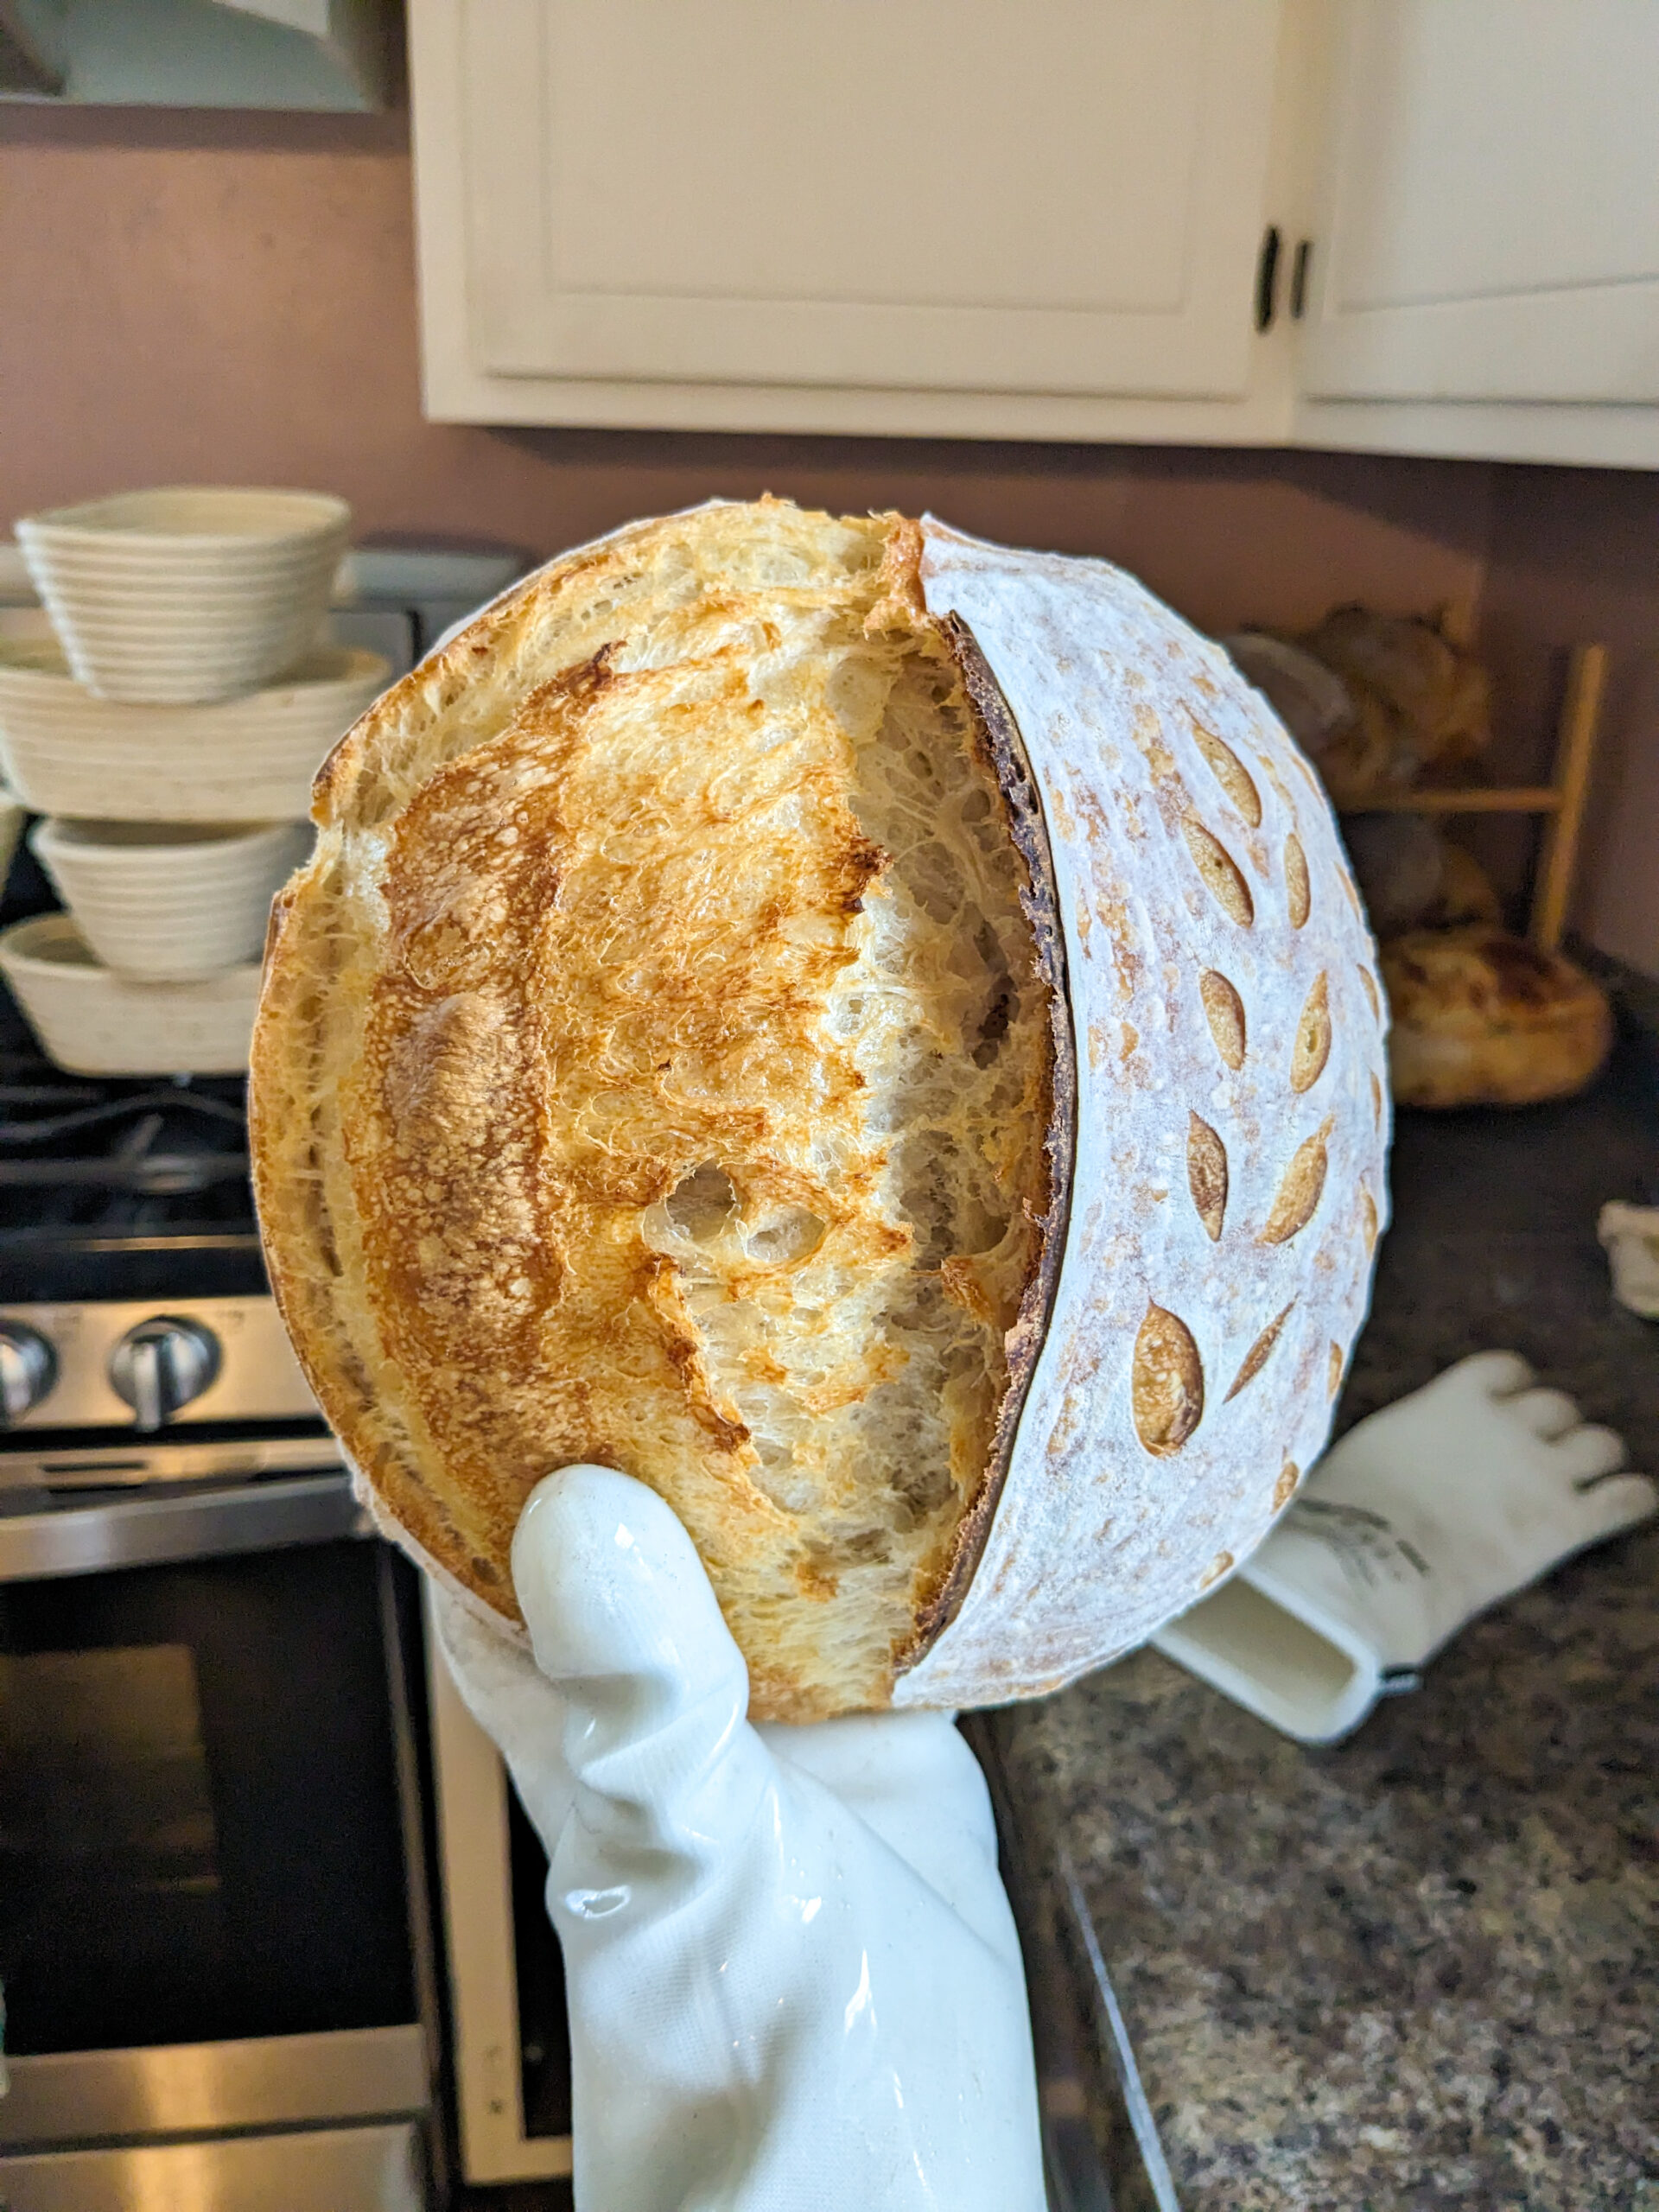
Use a bread lame/razor or a sharp knife to score a slit from end-to-end. I tilt the blade so it is at about a 45-degree angle to the bread surface, versus doing a straight up 90-degrees. This allows more of a “lip” in the slit, which will result in a bigger ear and more effective expansion.
*When baking in a bread pan, I tend to do the expansion score in the middle. When using a dutch oven. I will do score it 1/3rd of the way from the edge of the loaf and in more of a curved shape.
Add decorative scoring, if you’d like. Try to keep these as shallow as possible.
There are two components of scoring: Decorative score– this is just for aesthetics and where you only puncture the “skin” of the dough Expansion score– this is the long, deeper score along the loaf that gives it a weak point it to expand and rise in the oven.
TIP: Place your banneton on your stovetop while your bread is baking, The heat venting will help quickly- dry the basket.
Phase 6: Baking
BREAD PAN METHOD: If using bread pans, place the second bread pan over top and line the edges up so steam will not be escaping. Put in oven and bake for 30 minutes, covered. After 30 minutes, remove the bread entirely from the bread pans and place it directly on your oven rack. Be careful because the outside of the bread will still be very soft. Removing from the pans allows it bake more evenly, as the edges tend to brown more where they are touching the pan. Bake for an additional 10-15 minutes, until bread is browned to your liking.
DUTCH OVEN METHOD: If using a dutch oven, carefully lower the bread (on parchment paper) into your hot Dutch oven. Replace lid and bake for 30 minutes, covered. After 30 minutes, remove lid and bake for an additional 10-15 minutes, until bread is browned to your liking.
WHY COVER? The bread is baked with steam for the first 30 minutes to allow it to rise before the crust is set. It also helps jump into the glossy, crispy crust we all love. Steam is created by trapping the moisture evaporating from the loaf as it bakes via the cover on your baking vessel.
The final stage without a lid allows the crust to crisp up and brown.
Troubleshooting + Tips
Lorem ipsum dolor sit amet, consectetur adipiscing elit. Ut elit tellus, luctus nec ullamcorper mattis, pulvinar dapibus leo.
Traditional Artisan Sourdough Bread with All-Purpose Flour
A simple (easy to memorize), low hydration sourdough bread recipe that is easy to work with and beginner-friendly.
Banneton or bowl lined with parchment paper or cotton towel
Bench Scraper (optional)
Bread Lame or sharp knife
Parchment Paper or silicone sling, for baking
Dutch Oven or 2 loaf pans
Ingredients
325gramswaterif using bread flour, can increase to 350
100gramsactive sourdough starter
500gramsall-purpose flourunbleached
10gramssalt
Instructions
Mixing
Weigh water into a medium size bowl. Add starter and mix roughly to break the starter up.
Add in flour and salt. Mix together until no dry bits remain. Cover for 30 minutes.
Stretch and Folds
After 30 minutes, perform a series of stretch and folds. With wet hands, grab up one side of the dough, stretch it up and pull it across the dough. Rotate bowl and repeat, until you have come back to where you started. See post above for photos.Cover for another 30 minutes.
After 30 minutes, repeat the same process. You will do this for a total of 4 times, waiting 30 minutes between.This is important: the dough will start to be become more smooth and elastic, then will "tighten" up by the last set or two.DO NOT tear the dough. Only stretch it as far as it will go before resisting. You are building the strength of the gluten here, and you don't want to damage it by tearing it.
Bulk Rise
When you have done 4 sets of stretch and folds, cover the dough and let rise. This is the most difficult part to master: the bulk rise.You want it to rise until the dough has puffed up, jiggles when you shake the bowl, and has bubbles on the surface and sides.This could be anywhere from 2-12 (yes, seriously) hours, depending on the temperature of the room.
Shaping + Cold Ferment
Bench rest: When the bulk rise is over, dump the dough out and form it into a snug ball. Be careful not to tear the dough. (see above for details). Let sit for 20-30 minutes to allow the dough to relax again.After the dough has relaxed, flip the ball onto its back and shape it.There are many ways to shape. The most simple is to fold both sides to the center, then roll it up. This is adding more tension and structure to the dough.Place in a well-floured banneton, seam-side up.Cover with a towel and place in the fridge for 12-24 hours.The longer you leave it, the more sour it will become.
Baking
Before baking, preheat your oven to 450°. If using a dutch oven, put it in the oven when you turn it on and allow it to heat for 30 minutes after your oven reaches temperature. When the oven is ready, take your banneton out of the fridge and flip your dough onto a piece of parchment paper.Score (or cut) a line running down the length of the dough (see post for more tips and details). This allows the dough to expand during baking.
Bake for 30 minutes with the dough covered.Then remove the cover and bake for another 10-15 minutes, until browned to your liking.Let cool before slicing.